nfoTools
T060101c: Getting to “Hello”
| nfoTools | tools>t060101>c | index.html 0.1.3 2023-07-21 |
|---|---|---|
 |
Work in Progress |  |
C Language has a famous first program. Creating and operating that program is demonstrated, with links to expanded detail.
- T060101c: Getting to “Hello”
1. Install C/C++ Compiler Software
One of the first tools needed is software that compiles C Language files into programs that run on the computer. In this sketch, Visual Studio Build Tools are installed and ready for use.
2. Make a Folder for the Work
Create a computer folder for holding your work. It can be tentative for now. Have it in a place for personal data, not in any folder where software is installed. On a Windows PC, the Documents folder of a personal account will work; and that’s preferable on a PC that is shared with others.
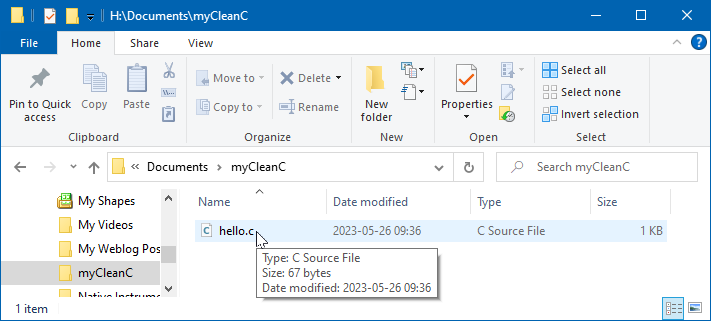
The file
hello.c has already been created in the folder Documents\myCleanC. The
file has extension .c instead of .txt, signifying, by convention, that
the text is in C language. With Visual Studio Code installed, the
extension is so-registered with Windows.
3. Make the hello.c Code
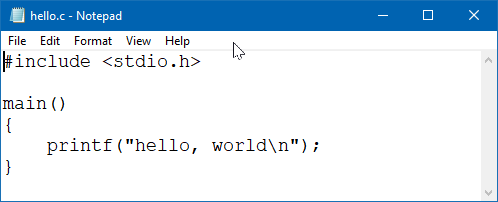
This is the very first program presented in the
[Kernighan1988] book, The C Programming Language.
Your program should be typed exactly and saved as file hello.c. Be exact,
character-by-character, line-by-line.
There is Hello World lore on all of the ways this “first program” has been accomplished. This program predates the prospect of Clean C, to be remedied below (6.3).
4. Initiate a Command Prompt
In the All Programs option on the Windows Start Menu, find the Visual Studio folder and expand it (“v”) to find the “x64 Native Tools Command Prompt …” or equivalent wording. The key element is “x64 Native.” Click that entry.

5. Compile and Run the Program
A console window (sometimes called a terminal) will be opened on the desktop. There is identification of initialization as a Command Prompt in this case. Commands are entered, step by step.
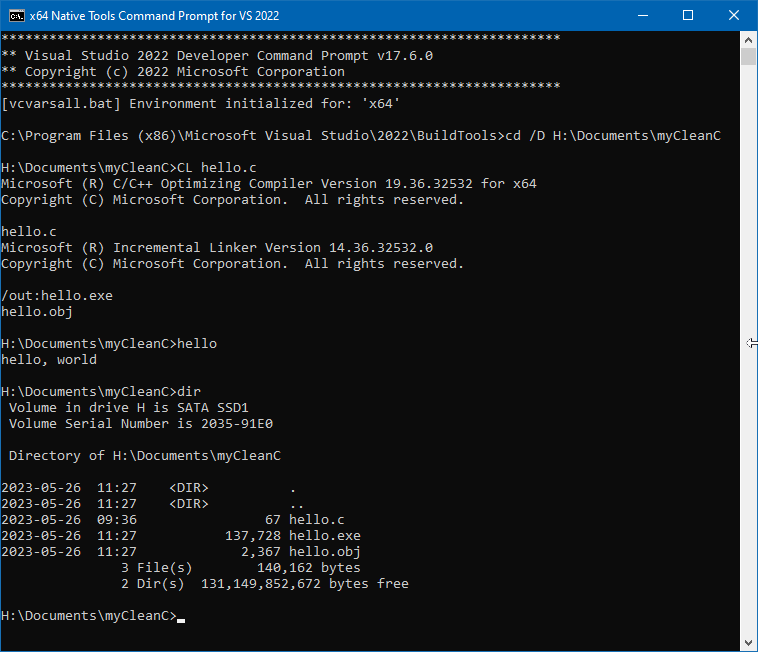
Breaking it down …
5.1 Get Situated

Selecting “x64 Native Tools Command Prompt” brings up a console window and
runs scripts that announce the tools and initialize the command-session
environment for building x64 programs.
- The title in the console window reflects the established setup. The tiny
“
C:\_” icon identifies the built-in utilityCMD.exethat provides Command Prompt operation. - The version of Visual Studio whose Build Tools are being employed is identified.
- The flavor of environment is reported and the first user command is solicited.
5.2 Navigate to myCleanC
The default prompt format consists of the file-explorer location (the
Current Directory, CD) followed by >. Commands are typed after
the “>” of a prompt from the computer.

The Developer Command Prompt starts at the location of the build tools, not where an project is.
WARNING: Do not use this location. Navigate to your working location.
Here, the command “cd /D H:\Documents\myCleanC” changes the current
directory to the drive and directory where hello.c is stored.
5.3 Compile hello.c

The command “CL hello.c” instructs the VC/C++ Compiler-Linker to compile
hello.c. In this simple case, compilation of the one file and producing
executable program “hello.exe” will be automatic.
5.4 Observe the compilation
If your hello.c is exactly the version shown in
3 above, the compiler
identification should be followed by the name of the file, hello.c to be
compiled and there should be nothing more before the Incremental Linker is
identified.
If there is anything else instead, there will be some diagnostic messages identifying the difficulties and the compilation will end. Any difficulties must be resolved and the process begun anew, step by step from 4, above.
When compilation of hello.c is successful in this initial stage, the file
hello.obj is silently produced. That intermediate result is then used by
the incremental linker.

After the linker identification, there will be automatic determination to
produce hello.exe from the file hello.obj.
If there were diagnostic messages about linking problems, they would appear before the next prompt. That’s unlikely here. It can be expected to happen in future situations.
5.5 Execute the resulting program
There being no misadventures, the file hello.exe is there in myCleanC.

The hello.exe program becomes available as a new command. The program is
requested with command “hello”; Windows will detect hello.exe in the
current directory and operate it there.
In this case, the hello.c printf() output will be directed to the Command
Prompt window as a line of text.
5.6 Look around in myCleanC
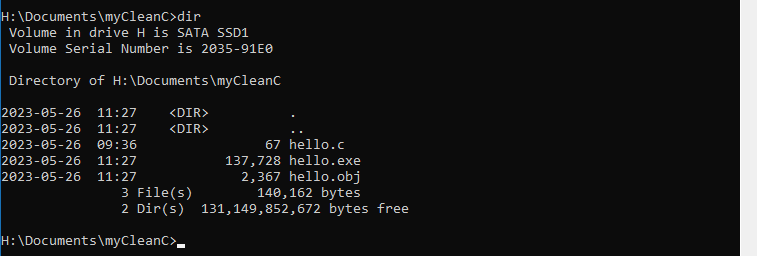
Finally, command line “H:\Documents\myCleanC>dir” issues the command for
listing the content of the Current Directory.
The intermediate file hello.obj is present. That hello.obj
intermediate is taken by the linker and combined with needed
library and setup code to produce hello.exe. The hello.exe file is
the complete program for carrying out the operation specifed in the
C Language of hello.c.
The simple 67-character hello.c is compiled to a 2,367 byte hello.obj of
native computer code and information on what libraries it depends on. The
final hello.exe is 137,728 bytes of complete executable-format
code. It is constructed to be run from a command prompt, just like a built-in
command.
5.7 exit command
End the Command Prompt session with the command exit.
6. Looking Down the Road
With practice and increasing proficiency, there will be improvements in the cycle of programming, compiling, and confirmation. Along the way there will be ways to have project work go more smoothly.
6.1 Improved project file organization
To collect projects together in a handy place, the myCleanC\ folder is
changed to have individual sub-folders for different programs, starting
with myCLeanC\hello\.
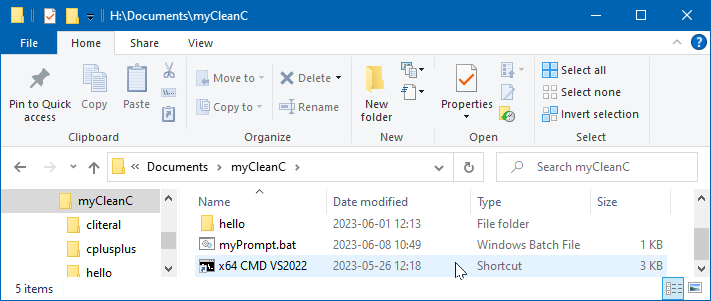
Along with this, a shortcut is created for creation of the Command Prompt
directly at myCleanC\. This will be handy for working on all of the
projects that will be placed under myCleanC\. There is also a short batch
script, myPrompt.bat that is used to customize the display of prompts.
6.2 Customized Command Prompt operation
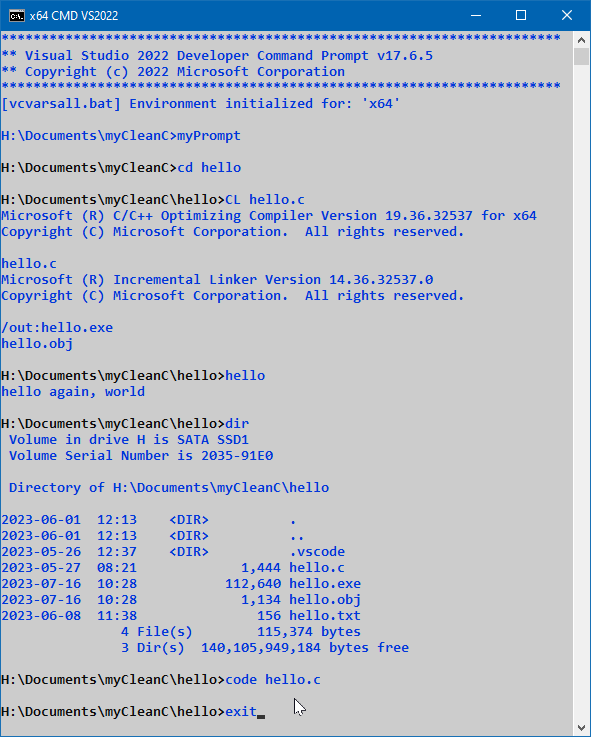
As can be seen in this session, the initialized Command Prompt starts
directly at myCleanC and there is a change in appearance accomplished by
the customized shortcut. There are many customizations available for the
overall color scheme display.
To accentuate the appearance of command prompts in the display, myPrompt
is the first command used in the fresh session. I’m using it to hsve the
prompt text be emphasized.
With the changes in setup and use of the shortcut, it is now a short hop to
the hello project in its new folder beneath myCleanC\. Compilation is
now done there.
After compilation and confirmation of the revised hello.c program, the dir
command listing of file sizes reflects changes in the hello.c program that
have the file be much more more verbose, as shown in
6.3, below. However, the
hello.obj and hello.exe files are smaller than at
5.6, above. The reduction of
program size is not particularly significant. The practice of simplifying
to what’s needed is what’s important, making dependencies on libraries
and other code more precise.
The file hello.txt is a log created as part of the demonstrations in
6.4, Quieting the Compilations, below.
There is also a new component, the subdirectory .vscode\. This is entirely
for use in conjunction with Visual Studio Code and need not be of any concern.
It only has effect when Visual Studio code is opened on the hello\ folder
as demonstrated next.
6.3 Incorporation of Visual Studio Code

The command entry “code hello.c” initiates
Visual Studio Code
for operation under the Command Prompt environment. File hello.c is named
as a to code; hello.c will be opened directly in the VS Code editor.
When VS Code is initiated under the developer Command Prompt, there is automatic recognition of the initialized environment. This is a powerful benefit.
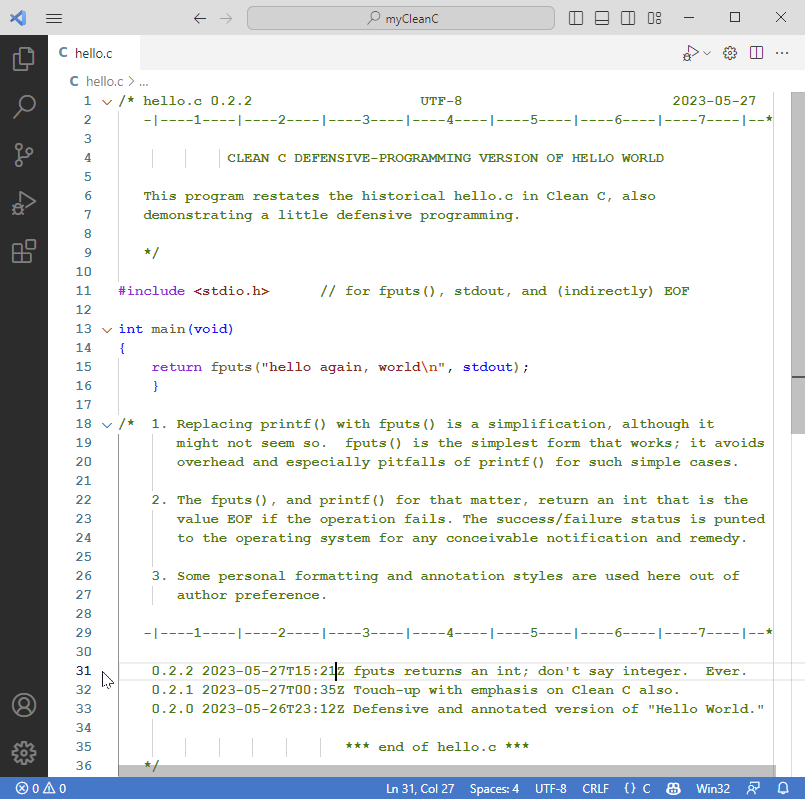
All of the green text is commentary. Only lines 11-16 provide the C Language code.
The color highlighting is provided automatically by VS Code, providing readability hints of the program’s C Language structure. There is a large collection of colorization schemes to choose from.
The hello.c program is now in Clean C. What makes the difference is the
first line,
int main(void)
When operated under the developer Command Prompt environment, Visual Studio
Code will recognize various defects in a C Language program. For this
hello.c none are identified.
It will become important to appreciate what is not provoking any VS Code commentary and warnings.
- The
#include <stdio.h>has been resolved to a file in the VC/C++ environment. - The
int main(void)is recognized as beginning the definition of a requiredmain()procedure. - the
fputs()matches with the definition instdio.hand the two parameters are of the proper form. stdout, also established instdio.his recognized as the indicator of the standard output stream, here to be automatically directed to the Command Prompt window the program is operated from.
All of this built-in checking, called IntelliSense, will be valuable as more-elaborate programs are developed.
6.4 Quieting the Compilations
After seeing it a few times, the details of compilation tend to clutter the work. There are ways to have compiler operations produce terse output.
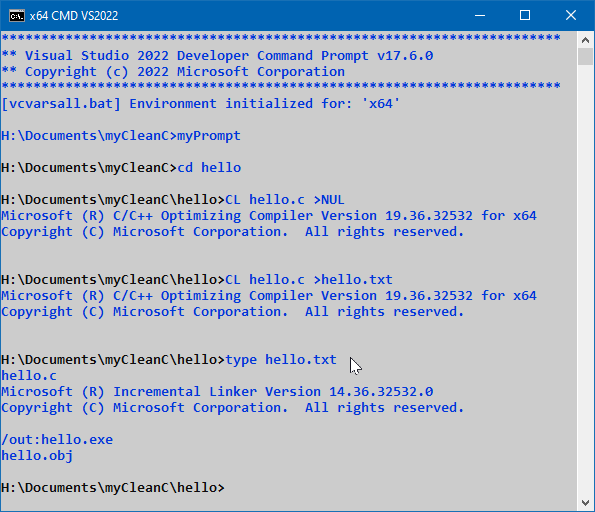
The previous compilation can be made terse in two ways.
First, the command “CL hello.c >NUL” causes the outputs from CL to be
directed to the NUL (nowhere) device. The only visible output in the
successful case is the identification of the C/C++ compiler.
If there are any error messages, they will still appear. The quiet operation
indicates that no difficulties are detected. In the case of error messages
and warnings, it may be necessary to repeat the compilation without the
“>NUL” to obtain further details.
An alternative to sending the output to the NUL bit-bucket is to direct the
output to a file. The command “CL hello.c >hello.txt” accomplishes that.
Now if there are errors and warnings, the full output can be seen by viewing
that file, accomplished with command “type hello.txt” in this example.
7. Fledgling Adventures
This progression of steps, and additional improvements in operation, are a foundation for creating many small programs made with single C Language files. Examples found in books and other resources can be compiled and operated.
There will be more to learn about the stages of compilation and the use of standard libraries, code from other sources, and reusable code of your own.
There will be more to practice and explore in using Command Prompts and also the Build Tools.
Start slow, start with small steps, and most-of-all, enjoy the journey.
Discussion about nfoTools is welcome at the Discussion section. Improvements and removal of defects in this particular documentation can be reported and addressed in the Issues section. There are also relevant projects from time to time.